The short answer: five decisions, two entry points
Sign in with the Google account that owns or manages the channel, start an upload, choose the file, fill in the details while it processes, decide who the video is for and who can see it, then submit. Desktop and mobile reach the same five decisions through different entry points, and those entry-point labels have changed more than once as YouTube has reworked its interface. Read the steps below as a description of the flow rather than a transcript of any single button name, and check the current screen before you write instructions for anyone else.
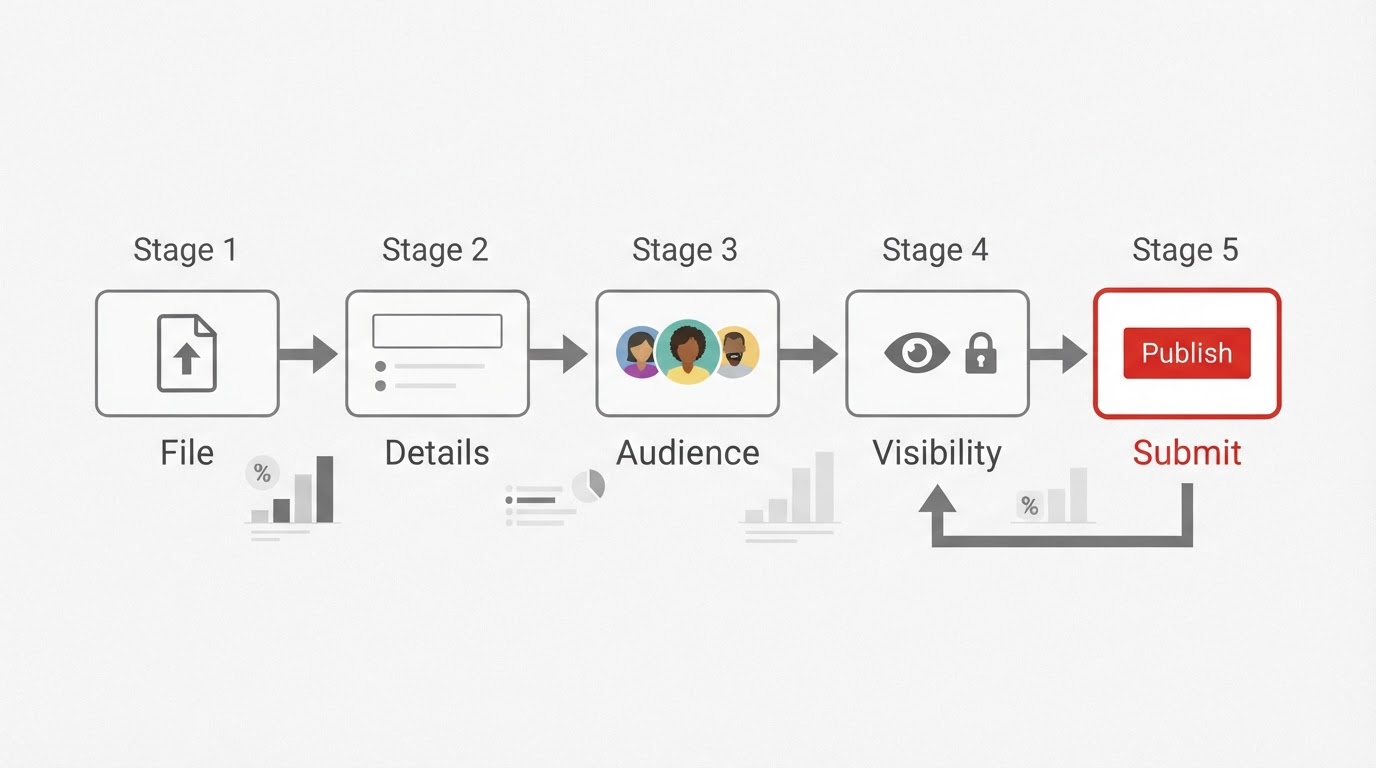
Two habits separate a clean upload from a cleanup job. Watch the uploaded video back in the player before you set it public. Write the title, description and thumbnail while the file processes, because that waiting window is the only free time in the whole process.
What to settle before you pick the file
Most failed uploads are decided before the file dialog opens.
- The right account. Uploading adds the video to whichever channel is active in the account switcher. Confirming the channel first prevents a personal video landing on a brand channel, or the reverse.
- A finished export, not a rough cut. Export the final render rather than the timeline preview. A file that plays in your editor but fails to process is almost always an unfinished or unusual export.
- A sensible container. MP4 with H.264 video and AAC audio is the safest pairing across desktop and mobile. Unusual codecs may still work, but processing takes longer and the failure mode is less obvious.
- Metadata to hand. A title within YouTube's 100-character field, a description, and a thumbnail image at 16:9 — YouTube documents 1280×720 as the minimum useful size.
- Two answers you cannot skip later. Whether the video is made for kids, and who should be able to watch it. Both are compliance decisions, not preferences.
Upload a video to YouTube from a computer
- Sign in and switch to the channel that should own the video.
- Open the create entry point. On the main YouTube site it is the create control near the top of the page; in YouTube Studio it is the create button that opens a menu with an upload option. The wording moves between interface revisions, so look for the create control rather than a memorised label.
- Choose the file by dragging it into the upload area or using the file picker. One file at a time is simpler; if you queue several, give each its own details pass.
- Fill the details while it uploads. The details screen opens before the transfer finishes. Title, description, thumbnail and playlist choices can all be entered here.
- Answer the audience question. YouTube requires a made-for-kids declaration on every upload. Answer it deliberately; it is not a visibility setting and it cannot be treated as one.
- Walk the intermediate checks. Copyright and ad-suitability checks run before publishing. Their results are informational — they tell you what the system noticed, not whether the video is good.
- Set visibility, then submit. Private, unlisted, public or scheduled. Submitting with private selected is a legitimate way to finish an upload and review it in the real player before anyone else sees it.
On desktop the file can keep uploading while you move between the details and visibility screens, so the slowest part is usually the transfer, not the form.
Upload from a phone or tablet
The mobile app compresses the workflow into fewer screens but asks the same questions. Open the app, tap the create control — a plus or camera icon, depending on version and platform — choose the video from the gallery, then step through title, audience and visibility before confirming the upload.
Three practical differences matter on mobile:
- The upload can outlive the session. Background transfer means you should not force-close the app, and a long upload over mobile data is worth deferring to Wi-Fi.
- Details are thinner. Description editing, thumbnails and end screens are easier at a desk. Uploading privately from the phone and finishing the metadata on a computer is a normal two-device workflow.
- The same account rules apply. The active channel in the app decides where the video lands, exactly as on desktop.
Title, description and thumbnail each do a different job
Field | What it decides | What to put in it |
|---|---|---|
Title | The label in search, suggested feeds, playlists and browser tabs | The specific subject, in the words a viewer would use; stay inside the 100-character limit |
Description | Context after the click, and the first two lines shown before expansion | What the video covers, any relevant links, and disclosure or credit lines |
Thumbnail | The frame a viewer scans before deciding | A legible subject at small size; 16:9, at least 1280×720 |
A thumbnail is not a decoration; it is the frame a viewer uses to decide whether the video is worth two minutes. Auto-generated frames are a starting point, not a finished choice — pick or upload an image that still reads at the size of a phone grid tile.
Descriptions get read more often than they get written carefully. The first sentence should describe the video without teasing it, because that sentence is what a viewer sees before tapping to expand, and it is also the text search engines are most likely to quote.
Audience and visibility are two different questions
The audience declaration is about compliance: whether the video is directed at children. It changes which features and personalised advertising the video can use, and it is required on every upload. Setting a video private does not remove the requirement.
Visibility is about reach:
- Private — only you and accounts you explicitly allow can watch. Good for review passes.
- Unlisted — anyone with the link can watch, but the video does not appear in search or on the channel. Useful for sharing a review cut with a client or collaborator.
- Public — visible to everyone and eligible for search and recommendations.
- Scheduled — becomes public at a set time. Scheduling assumes public treatment; it is not a private holding state.
The common mistake is treating unlisted as private. Anyone who receives the link can watch an unlisted video, and links travel.
Review the finished video before you submit
The upload preview is a real player, which makes it the first honest test of the file rather than the timeline. Watch from the beginning at normal speed and check for audio drift, missing captions, a black opening frame, the wrong export, or an end card that arrives before the last line finishes. It is cheaper to replace a private upload than to correct a public one.
A short review pass, in order:
- Playback end to end, sound on.
- Opening three seconds — does the first frame make sense from a standing start?
- Captions and subtitles, if you added them, aligned with the speech.
- Description and thumbnail as they appear on the watch page.
- Visibility setting read back to yourself, out loud, before you change it.
If the finished video was produced in Meltica
Some creators upload a video they did not export from a desktop editor. Meltica's YouTube publishing is designed for that case, with a deliberately narrow scope: after Google authorization, the creator reviews the title, description, audience and visibility for each video and then explicitly submits the upload. Connecting a channel never publishes anything automatically, the OAuth scopes cover uploading selected videos plus reading channel information, upload status and available statistics, and access can be disconnected and revoked at any time. Availability depends on account access, site configuration and Google's approval, so treat the publishing option as something to confirm in your workspace rather than assume. Nothing in that flow replaces the review pass above — the same pre-publish checks apply whether the file comes from an editor or from a workspace.
Common questions
The upload is stuck on processing. Processing time scales with length and resolution, and 4K files take noticeably longer. If the progress indicator has not moved for a period that feels unreasonable for the file size, cancel that upload and start again with a re-exported MP4 — a stalled transfer is usually a file or connection problem rather than a platform one.
I published with the wrong visibility. Change it on the same video rather than re-uploading. Switching from public to private or unlisted stops new viewers from finding it, but it does not undo views, shares or copies others have already made.
I need to undo channel access. Revoking authorization in your Google account's third-party access settings removes the connection; the videos already published stay on the channel. If a workspace offered the connection, its own disconnect control does the same thing.
Can I upload on my phone and edit on a computer? Yes. The video belongs to the channel, not the device, so details, thumbnail and visibility can be changed later from any signed-in device.
Should I edit after publishing? Small metadata edits are routine and safe. Replacing the video file itself is possible but resets processing, so if the content is wrong, an unlisted review pass before publishing is the cheaper path.
The five decisions, once
Uploading is not difficult; it is easy to do in the wrong order. Confirm the channel, choose a finished export, write the details during the transfer, answer the audience question honestly, pick visibility deliberately, and watch the result in the player before you make it public. Do that once and the checklist stops being a checklist — the next upload is the same five decisions, in the same order, with nothing to remember.